最近在开发过程中遇到了一个棘手的问题:有一些配置信息,需要以键值对或者列表的形式从配置文件中注入到代码里,配置中心使用的是Nacos。在正常情况下,使用Nacos我们都是key-value的配置,那么我们要是想将配置注入到List或者Map中,应该怎么办呢?
我们在使用spring本地配置的时候,可以使用@ConfigurationProperties注解将一个文件中的所有内容注入到类的各个对应属性上,在Nacos中,也有类似的注解@NacosConfigurationProperties,我们看下该类的解析工具com.alibaba.nacos.spring.context.properties.config.NacosConfigurationPropertiesBindingPostProcessor,该类实现了BeanPostProcessor接口。
拓展一下
它是SpringIOC容器给我们提供的一个扩展接口:
1
2
3
4
5
6
7
8
9
10
11
12
13
| public interface BeanPostProcessor {
@Nullable
default Object postProcessBeforeInitialization(Object bean, String beanName) throws BeansException {
return bean;
}
@Nullable
default Object postProcessAfterInitialization(Object bean, String beanName) throws BeansException {
return bean;
}
}
|
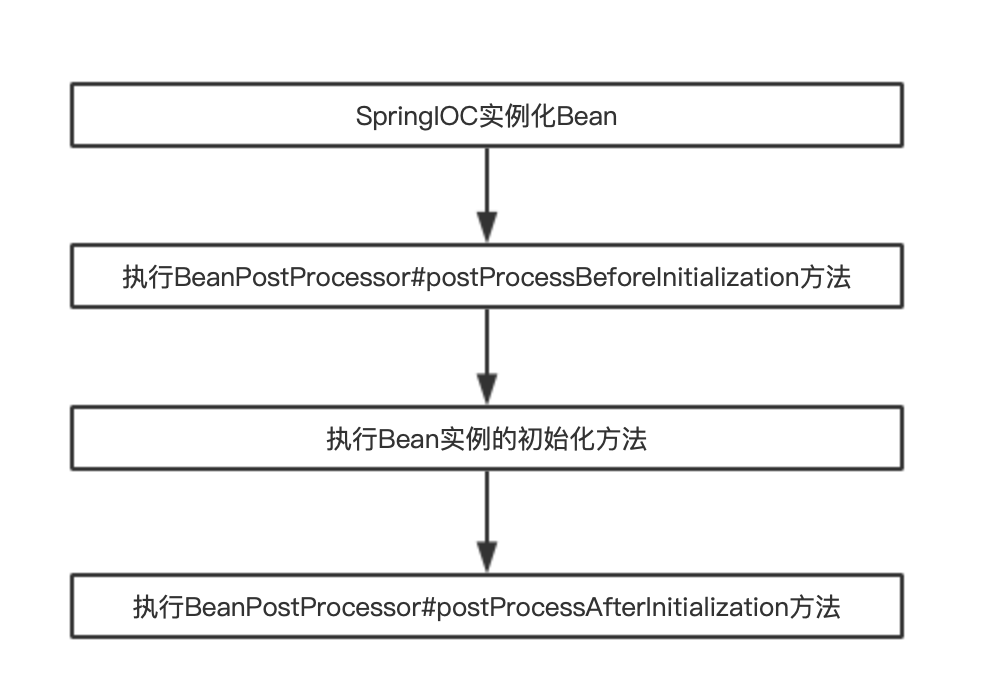
在BeanPostProcessor中有两个方法,当实现了该接口的类注册到SpringIOC容器后,在类实例初始化方法(afterProperties和自定义init等方法)调用之前,将会执行BeanPostProcessor#postProcessBeforeInitialization方法,在实例初始化方法执行完之后,会调用BeanPostProcessor#postProcessAfterInitialization方法,整个的调用顺序为:

回归正题
首先看一下NacosConfigurationPropertiesBindingPostProcessor#postProcessBeforeInitialization方法的代码:
1
2
3
4
5
6
7
8
| public Object postProcessBeforeInitialization(Object bean, String beanName) throws BeansException {
NacosConfigurationProperties nacosConfigurationProperties = findAnnotation(bean.getClass(), NacosConfigurationProperties.class);
if (nacosConfigurationProperties != null) {
bind(bean, beanName, nacosConfigurationProperties);
}
return bean;
}
|
可以看到在每一个bean被初始化之前,都会获取一下该类是否被@NacosConfigurationProperties所装饰,如果被装饰了则执行bind方法,为了省篇幅,我们直接看到最底层的bind方法的代码,在类NacosBootConfigurationPropertiesBinder#doBind方法中。
为什么在这个类里呢?
从NacosConfigurationPropertiesBindingPostProcessor#postProcessBeforeInitialization方法中跟进代码,是进入到了NacosConfigurationPropertiesBinder#doBind方法啊,这里就要看下NacosBootConfigurationPropertiesBinder类的定义了:
1
2
| public class NacosBootConfigurationPropertiesBinder
extends NacosConfigurationPropertiesBinder {}
|
该类是NacosConfigurationPropertiesBinder的子类,那么这个类是在哪里被注册到IOC容器里的呢?从代码中我们跟踪到NacosConfigBootBeanDefinitionRegistrar类中,该类使用注解@Configuration通知SpringIOC主动的将其加载到容器中,看一下该类的代码:
1
2
3
4
5
6
7
8
9
10
11
12
13
14
15
16
17
18
19
| @Configuration
public class NacosConfigBootBeanDefinitionRegistrar
implements ImportBeanDefinitionRegistrar, BeanFactoryAware {
@Override
public void setBeanFactory(BeanFactory beanFactory) throws BeansException {
DefaultListableBeanFactory defaultListableBeanFactory = (DefaultListableBeanFactory) beanFactory;
BeanDefinitionBuilder beanDefinitionBuilder = BeanDefinitionBuilder
.rootBeanDefinition(NacosBootConfigurationPropertiesBinder.class);
defaultListableBeanFactory.registerBeanDefinition(
NacosBootConfigurationPropertiesBinder.BEAN_NAME, beanDefinitionBuilder.getBeanDefinition());
}
@Override
public void registerBeanDefinitions(AnnotationMetadata importingClassMetadata,
BeanDefinitionRegistry registry) {}
}
|
类实现了BeanFactoryAware和ImportBeanDefinitionRegistrar两个接口,这两个接口是干什么的呢?熟悉Spring的同学应该都狠清楚,这里简单的讲一下:BeanFactoryAware是一个可以将BeanFactory实例注入到当前类的一个接口,在类中可以通过实现BeanFactoryAware#setBeanFactory方法来注入BeanFactory实例,在Nacos中,通过在setBeanFactory方法中将NacosBootConfigurationPropertiesBinder类注入到IOC容器中;而ImportBeanDefinitionRegistrar接口是给Bean的注册提供了更加灵活的方式,实现了该接口的Bean并不是直接注册到IOC容器中,而是可以通过@Import注解动态的选择性的注入到容器中,让Bean的注册更加的灵活方便。
又说多了,现在我们来看NacosBootConfigurationPropertiesBinder中的doBind方法:
1
2
3
4
5
6
7
8
9
10
11
12
13
14
| protected void doBind(Object bean, String beanName, String dataId, String groupId,
String configType, NacosConfigurationProperties properties, String content, ConfigService configService) {
String name = "nacos-bootstrap-" + beanName;
NacosPropertySource propertySource = new NacosPropertySource(name, dataId, groupId, content, configType);
environment.getPropertySources().addLast(propertySource);
Binder binder = Binder.get(environment);
ResolvableType type = getBeanType(bean, beanName);
Bindable<?> target = Bindable.of(type).withExistingValue(bean);
binder.bind(properties.prefix(), target);
publishBoundEvent(bean, beanName, dataId, groupId, properties, content, configService);
publishMetadataEvent(bean, beanName, dataId, groupId, properties);
environment.getPropertySources().remove(name);
}
|
最关键的就在于binder.bind(properties.prefix(), target)方法,我们从debug到binder中,最终找到了bindObject方法,方法中有AggregateBinder<?> aggregateBinder = getAggregateBinder(target, context);代码,目的是什么呢?来看下源码:
1
2
3
4
5
6
7
8
9
10
11
12
13
| private AggregateBinder<?> getAggregateBinder(Bindable<?> target, Context context) {
Class<?> resolvedType = target.getType().resolve(Object.class);
if (Map.class.isAssignableFrom(resolvedType)) {
return new MapBinder(context);
}
if (Collection.class.isAssignableFrom(resolvedType)) {
return new CollectionBinder(context);
}
if (target.getType().isArray()) {
return new ArrayBinder(context);
}
return null;
}
|
这里就很明显了,找出被注入熟悉的类型,然后迭代注入,所以我们的配置文件内容为:
1
2
3
4
5
6
7
8
9
10
11
12
13
| error-code:
code-map:
10001001: 问题标题必填
10001002: 问题ID必填
user-name:
- 1
- 2
- 3
- 4
- 5
- 6
- 7
|
被注入类:
1
2
3
4
5
6
7
8
| @Configuration
@NacosConfigurationProperties(prefix = "error-code", dataId = "starter_error", type = ConfigType.YAML)
public class ArgsErrorCode {
private Map<String, String> codeMap;
private List<String> userName;
}
|
done!

