引言
我们知道搭建MySQL集群有MHA、MGR、MMM,以及MySQL官方提供的MySQL-Cluster方式,以下主要以MGR方式为主做介绍,稍后再介绍这几种集群方式的差异。
我们先简单的介绍一下MGR架构,MGR的全称是MySQL Group Replication,是官方在5.7.17版本推出的基于paxos协议的集群方案。有人说MGR是基于状态机的集群设计,每一个节点都可以看做是一个状态机,任何一个节点出现
-
服务器信息
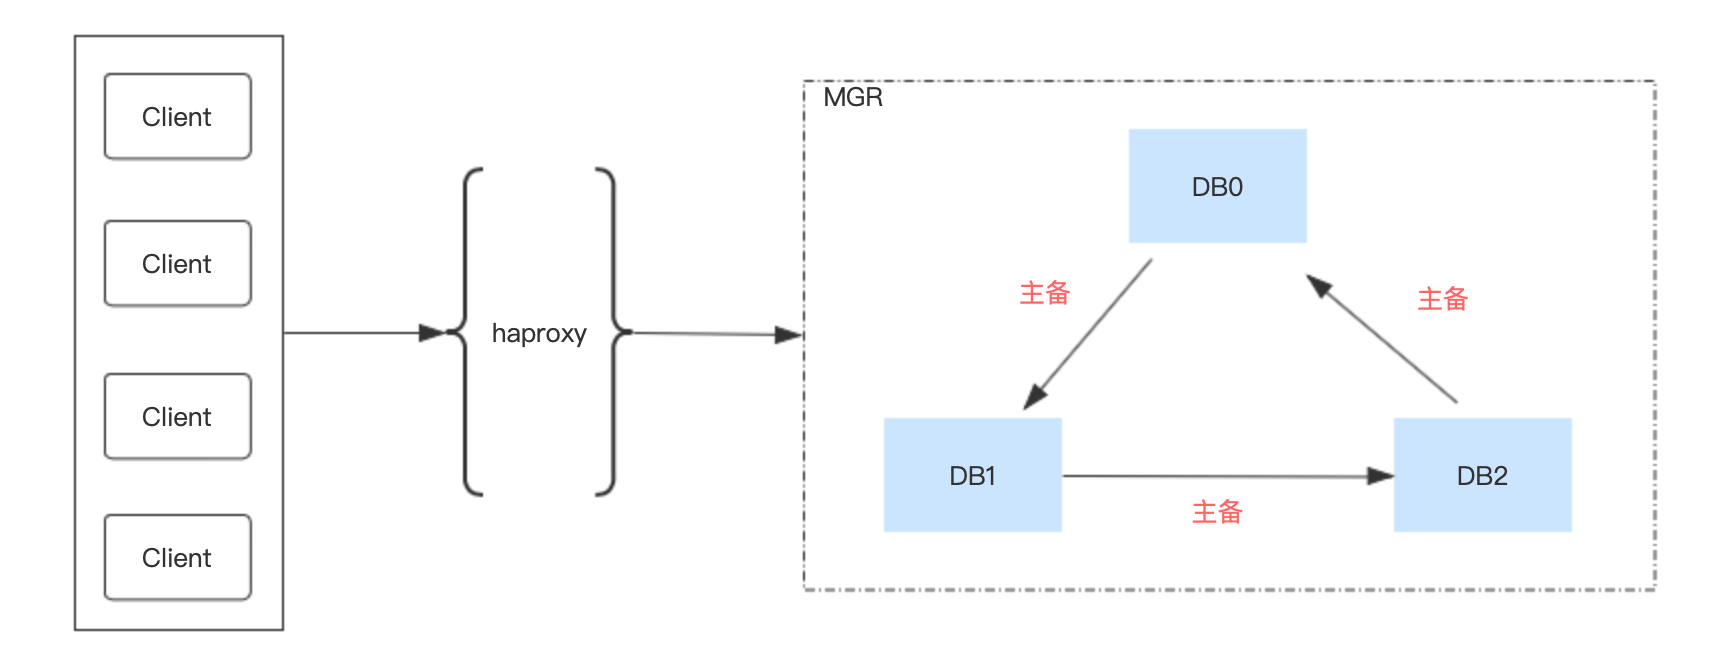
我准备了四台机器,一台haproxy节点,三台MySQL节点,这三个MySQL节点均为Master,并且互为主备。
主机IP OS 软件 10.154.8.18 centos 7.0 haproxy 10.154.8.113 centos 7.0 master 10.154.8.130 centos 7.0 master 10.154.8.149 centos 7.0 master -
架构图

安装MySQL
1 | cd /data1/software/mysql/ |
配置MySQL
vim /etc/my.cnf
1 | [mysqld] |
配置无需密码登录
略…
启动MySQL
1 | service mysqld start |
1 | alter user 'root'@'localhost' identified by 'ojbKwcrpqiOhsg8/i'; |
haproxy
1 | GRANT ALL ON *.* TO 'haproxy'@'%' IDENTIFIED BY '123'; |
MGR说明
server-id=1 // Mysql服务ID,集群内必须唯一
gtid-mode=on // 全局事务
enforce-gtid-consistency=on // 强制GTID的一致性
master-info-repository=TABLE // 将master.info元数据保存在系统表中
relay-log-info-repository=TABLE // 将relay.info元数据保存在系统表中
binlog-checksum=none // 禁用二进制日志事件校验
log-slave-updates=on // 级联复制
log-bin=binlog // 开启二进制日志记录
binlog-format=ROW // 以行的格式记录
transaction-write-set-extraction=XXHASH64 // 使用哈希算法将其编码为散列
loose-group_replication_group_name=‘7e6fe64a-3bc0-4117-9cac-2439f9c3f19e’ // 加入的组名,可以修改,只要格式对
loose-group_replication_start_on_boot=off // 不自动启用组复制集群
loose-group_replication_local_address=‘node1:33061’ // 以本机端口33061接受来自组中成员的传入连接
loose-group_replication_group_seeds=‘node1:33061,node2:33062,node3:33063’ // 组中成员访问表
loose-group_replication_bootstrap_group=off // 不启用引导组
设置hostname映射
1 |
|
开启组复制
- 主
1 | change master to master_user='slave',master_password='k3G_w9Z&eeip' for channel 'group_replication_recovery'; |
-
备
1
2
3
4
5
6
7
8
9
10
11change master to master_user='slave',master_password='k3G_t9Z&eeip' for channel 'group_replication_recovery';
install PLUGIN group_replication SONAME 'group_replication.so';
SET GLOBAL group_replication_ip_whitelist="10.154.8.113,10.154.8.130,10.154.8.149,10.154.8.208";
set global group_replication_allow_local_disjoint_gtids_join=ON;
start group_replication;
select * from performance_schema.replication_group_members;
搭建haproxy
-
下载haproxy-1.8.25.tar.gz
1
wget -C https://www.haproxy.org/download/1.8/src/haproxy-1.8.25.tar.gz
-
安装
1
2
3
4
5
6
7
8
9
10
11
12
13
14
15
16
17
18
19
20
mkdir /usr/local/haproxy
mkdir /etc/haproxy
touch /etc/haproxy/haproxy.conf
yum install -y gcc
tar -zxvf haproxy-1.8.25.tar.gz
cd haproxy-1.8.25
make TARGET=generic prefix=/usr/local/haproxy
make install PREFIX=/usr/local/haproxy
ln -s /usr/local/haproxy/sbin/haproxy /usr/local/bin/
ln -s /usr/local/haproxy/sbin/haproxy /usr/local/etc/haproxy -
配置
1
2
3
4
5
6
7
8
9
10
11
12
13
14
15
16
17
18
19
20
21
22
23
24
25
26
27
28
29
30cat > /etc/haproxy/haproxy.conf << EOF
global
# chroot /usr/local/etc/haproxy
log 127.0.0.1 local5 info
daemon
defaults
log global
mode http
option httplog
option dontlognull
timeout connect 5000
timeout client 50000
timeout server 50000
listen admin_stats
bind 0.0.0.0:8888
mode http
stats uri /dbs_monitor
stats realm Global\ statistics
stats auth admin:admin
listen proxy-mysql
bind 0.0.0.0:3306
mode tcp
balance roundrobin
option tcplog
option mysql-check user haproxy
server MySQL_1 10.154.8.113:3306 check weight 1 maxconn 2000
server MySQL_2 10.154.8.130:3306 check weight 1 maxconn 2000
server MySQL_3 10.154.8.149:3306 check weight 1 maxconn 2000
option tcpka
EOF -
启动
1
haproxy -f /etc/haproxy/haproxy.conf
